Ok, I think I'm ready to explain how to make the cute dog collar flower bling.
This is my model, Rosalea.
Tools:
- Ribbon (any width would do, best would be 7/8" to 1 1/2", I've even used smaller)
- About 3-4" of 3/8" width ribbon
- Quarter, Half Dollar or Dollar coin
- Wood Burning Tool
- Glass working surface (I used the glass from an old picture frame, and wrapped the edges with duct tape)
- Needle & Thread
- Hot glue or E-6000
- Plastic hair band (I use clear plastic bands. The tiny ones from Walmart)
Here's my glass surface, wrapped in duct tape. Ignore the glue & glitter mess.
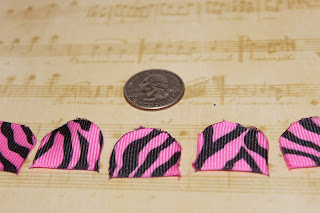
Plug in your wood burning tool. This is great on the ribbon, because it seals the edges, so they don't fray. I got mine at walmart for around $10.00. Lay your quarter on your ribbon (this is the 7/8" ribbon) and carefully burn around the quarter to make your petal. You will make 5 petals in all.
The white zebra petals were made with a Dollar Wood coin, the pink with a quarter. You can use a quarter on all of the ribbon. Just use what is handy.
Next take your needle and thread (with a knot at the end of the thread) and stitch at the bottom of your petal, as shown above. You will follow the same pattern with each petal, adding to the same strand of thread.
Now you have all petals on your thread..
Pull the thread together, scrunching up your petals into a flower. Pull it as tight as you can, and tie the two ends together, making a couple of knots in the back of the flower. Cut off your loose ends.
Here's the first flower. I like to bling mine up.

I have these cheap little Acrylic Jewels from Walmart, and Bedazzle beads. You can get a variety pack of those at Walmart too. You don't need the actual Bedazzler. I live in the boonies, so I rely on Dollar General & Walmart for a lot of my craft needs. When I get near a Hobby Lobby or Michaels, I have to really stock up!!
You can use your hot glue gun or E-6000 glue. E-6000 takes longer to dry, but works great. Hot glue is faster, and safer, but not as sturdy.
Think about safety when making these. Do you have other dogs who may chew on the flowers? If so, your best bet would be to remove the flower, when you are not present. For some reason, my dogs do not chew on their, or each other's flowers.
I used E-6000 on this, and a bedazzle bead. There are prongs on the back, you may need to bend them in. If you have several layers of flowers, you really don't have to worry about it.
Now I take my 3/8" ribbon and hair band, tie the ribbon around the band in a tight knot. Use a lighter to sear the edges of your ribbon, so it will not fray.
Next, layer and glue. If you want to make more than one flower layer you can.
2 layers of flowers. This is the 1 1/2" and 7/8" width ribbon.
Now, just add them to your dogs collar, or hair!
Here's my sister's Yorkie wearing one. Not the best pic, but you can see they make cute top knots. This is just one layer, since she is small and it is on her head.
And, Rosalea wearing one of her Flowers. Always styling, my little fashion diva!! ****Don't forget, always be safe when trying new things with your pets. This could be a choking hazard!! Please be careful & watchful!*****
 |
Here are several other Bling Flowers I made.
|

This is how the flowers stand up after several weeks of wear.
 |
| Pig |

 |
| Rosalea, near the flower bed |
 |
| Jinx with her flower bow as a top knot |
 |
| Great as a top knot! |


