Thursday, September 20, 2012

Litter box, turned into a storage box.

I have some clutter in my living room, that was really bothering me.  A few magazines, crochet patterns, and a mess of resumes.  I needed a neat place to put them, besides the floor, but also keep them close at hand when I need them.  I'm not much for sitting and zoning out at the tv, which is pretty much what my husband does after work.  So, I spend quality time next to him, crocheting, flipping through a magazine, working on my resume, or playing on the IPhone while sometimes watching tv.  I really don't like wasting time.  I went into my craft room, searching for some type of storage or an empty box I could convert to storage.  I found an almost empty box of cat litter.  The cats live outside now, so the litter is just taking up space.  So, I dumped what was left in a bag (I might need it for something later!).  I cut the top of the box off, then cleaned the inside out with a damp paper towel.


Empty cat litter box


I took the box outside, with black spray paint.  I love this spray paint.  I repainted some ugly blue storage containers my husband brought home for me with this paint.  They are styling now!

This paint is Krylon Fusion for Plastic in Black Gloss.  It works great on cardboard too!

If you miss any spots, you can always touch up with a black permanent marker.  Which is what I did.

Next, I got a piece of 12x12 scrapbook paper.  I cut off 3 inches of each end, making it 9x9 inches.  I took the square piece and spray glued it to the center of the front.  I glued the other 2 pieces to the sides.  I left the back blank, but you can put paper on it also.

Front of litter box

One side of litter box

My other side of the box was shorter, because of the opening/pour spout of the litter box, so my shorter piece of paper fit it just right.  I just forgot to take a picture of it.


I hope you try this simple revamp of any old sturdy box.  Great storage, and super cute!!

Crispy Chicken Legs in the oven

Every time I make chicken, my step daughter and husband grab for the chicken legs.  So, this time I bought a package of chicken legs.  This recipe is simple, crunchy, lots of flavor, and was ate up by everyone!  I just can't beat that.


The Ingredients:
8-10    chicken legs
1 c       buttermilk
3 tbsps butter melted
1 c       flour
1/4 c    Italian bread crumbs (plain would work also)
1 tsp    salt
1 pkg   Italian salad dressing mix

Directions:
Put your chicken legs in a bowl or ziplock bag.  Add buttermilk and melted butter and let soak for at least 15 minutes.  Your butter may get clumpy if your chicken legs are really cold.  This is ok.  I just like the extra flavor and juices of the butter.

Pre heat oven to 425F

Mix your flour, bread crumbs, Italian seasoning and salt in a baggy.  Drop your chicken in & shake until covered.  Place your chicken in a baking dish lined with tinfoil that has been sprayed with cooking spray.

I baked mine for 1 hour & 15 minutes, turning halfway through.  Always check your chicken is not pink, and runs clear.  Your chicken may cook quicker, so double check it after about 50 minutes.  My family will not eat pink chicken!

We also had green beans and "Atomic Buffalo  Turds", which I cooked with the chicken.  I stuck them in about halfway through the chicken cooking process.  They are awesome!  Check out their link, they have directions for oven, grill, and smoker.
Today I am 23 weeks and 6 days pregnant.  About to hit the 3rd trimester!!

I am not the best Blogger out there, it has been awhile!  I've even been laid off, and still have not got around to blogging.  Searching for a job is a lot of work, but I finally got a job offer yesterday.  I must say, I am proud of myself getting a good job with my baby bump!

Everything is going great with the pregnancy.  We had the 20 week ultrasound, and now we know it's a girl!!  Her name will be Ragan Marie.  She is progressing just the way she should.  I'm so proud of her!  Here's a couple of her ultrasound pictures.
She looks like my step daughter, Kennedy in this one!!


Here I am!  Baby bump at 20 weeks.

This is Kennedy, when we told her it was a girl!  She was so happy.
She's ready for bed, we got home pretty late after 2 doctors appointments
in OKC (a three hour drive for us)


Tuesday, August 21, 2012

Today I am 19 weeks and 4 days pregnant!  Next week we will find out if it's a boy or girl.  I have an appointment with my OB dr, and the high risk Dr.  Dr Smith (high risk) will do the ultrasound, to check for abnormalties, the progress of the baby, and the gender.  We can't wait!  Here's my belly change so far.  I did this on my phone, I will do something much cuter once I get closer, or until the baby is here.


Friday, July 20, 2012

Zucchini Bread & Muffins

I found this recipe on "recipes.com"  The title is "Mom's Zucchini Bread" by v monte.  I could only find one bread pan, so I decided to make 6 muffins out of the other half of the batter.  I also changed the recipe just a tiny bit.  Ignore my messy kitchen in the background.  Was canning pickles that day too.

Ingredients
3 cups of all-purpose flour
1 tsp salt
1 tsp baking soda
1 tsp baking powder
3 tsps ground cinnamon (I used 2, my husband is allergic, and it was still too much)
3 eggs
1 cup of vegetable oil (I used melted butter instead, yum!  Sinful!)
2 1/4 cups white sugar
3 tsps vanilla extract
2 cups grated zucchini
1 cup chopped walnuts (I used 1/2 cup, because I was low on walnuts)

Directions
Preheat oven 325 degrees F

Grease bread pan & muffin pan (I used cute paper muffin cups instead for the muffins)

Beat eggs, oil (or butter), vanilla and sugar together in a large bowl.  Add flour, salt, baking soda, baking powder & cinnamon to creamed mixture and beat well.  It will be a thick mixture, not runny like cake.  Stir in zucchini and nuts until well combined.

I put half the mixture in the bread pan.  Then divided the other half between the 6 muffins.   The muffins were almost full to the top.

Place in oven

Cook muffins 30-35 minutes
Cook bread 40-60 minutes.

Everyone's oven is different.  I start checking my goods about 5 minutes before the time posted on a recipe.  Just to be safe.


Lab results for defects

Tuesday, July 17th I got the call from the Genetics Counselor that our lab work came back good.  No problems detected!  I don't know all the lab they ran, but I do know they ran testing for:

Down's Syndrome
Trisomy 18
Neural tube Defects (NTDs)

Yay Baby!!


Thursday, July 12, 2012

My first Pregnancy at 40!!!

I am very happy to announce we are having a baby in January 2013!  My husband and I have been trying for about 4 years.  I had pretty much given up on ever getting pregnant, though deep down I still wanted it to happen.  I prayed about it for at least 3 years almost every night.  A few days before my 40th Birthday I went to my Dr for my annual female exam (a couple of years late).  She said my next step was to go to a fertility clinic if I was really serious about getting pregnant.  The longer I waited, the harder it will be for me to get pregnant.  I had went over the idea of the whole "fertility clinic" a few years back, and had decided it would never be for me.  I've had Rheumatoid Arthritis since I was 21 years old, and also diagnosed with Lupus (which has never effected any of my organs).  I just didn't want the stress of "fertility doctors".  So, I told her no.  I was going to stick with the old fashion way, and keep praying.

I want to say, that I was never one of those women who was in a rush to "get married and have babies".  Unlike all of my friends.  I wanted to finish college, date, have some fun while I was young.  I did know that eventually, I did want to settle down, but no rush.  I met my first husband at 28, and was 31 when we got married.  Really, all seemed great.  But things did not work out for us, all for the best in the end.  I met my husband, RF when I was 34.  We wanted the same things, and connected really fast.  I knew right away, that I wanted a life with him.  We were married a year after we met, and I trashed the birth control.

Every single time my period started, I would be frustrated!  But, I would tell myself we will keep trying, and if it was meant to be, it would happen.  My last period was on April 6, 2012, though I did not realize that until nearly 2 months later.  I had what I thought was my period my normal 25 days later.  But, it only lasted one day.  Odd for me, but it had happened before.  I was feeling kind of lucky.  25 days after that I had a very light 1 day "period".  When it didn't continue into the next day, or the day after.  I got very suspicious.  I had been exhausted lately, and taking naps in the middle of the day.  Was I pregnant?!  I thought there was no way!  It was Sunday, May 26th (Memorial weekend).  I ran into Dollar General, the only retail store in our small town, and bought a pregnancy test.  Went straight to the bathroom when I got back home.  It showed positive right away!  I felt myself tear up, but was still in disbelief.  I sat down and just looked at it, crying.  I just knew it was wrong somehow.  I went into the living room to tell my husband.  He was watching tv, I held the test behind my back and said "I think I will need to go to the Dr Tuesday".  He looked kind of scared, because he knew I hadn't been feeling myself (exhausted).  I pulled out the pregnancy test, smiling (trying not to cry) and showed him.  I said "It's positive".  I think he was in as much disbelief as I was.  He hugged me and said he was happy, and hoped it was true.

As the day dragged, and I couldn't get it off my mind, I decided I needed to be reassured.  So, I went back to Dollar General & bought 2 more pregnancy tests.  I took one late that evening, before bed.  It showed positive right away!  First thing the next morning, I took the other one.  Same thing, positive!  Maybe this was really true.  I had to wait until Tuesday to see the Dr to confirm it.  Monday was Memorial Day.  So, that was probably the longest Memorial Day ever.  Especially because we had nothing going on, and were just hanging out at the house all day.  Of course, I did a little research on the internet.  The spotting I had, that I thought was my period was actually implantation spotting.  A lot of people confuse it with their periods.  I kind of felt stupid, but hey, my only symptom so far was fatigue.  No morning sickness at all (awesome!!).  I also found out my approximate due date, and the size the baby would be.  The size of a prune.  So, when RF and I talked about it, we called it "the prune".  Mostly so my step daughter didn't know what we were talking about.  We wanted to wait to get a positive result from the Doctor to say anything.  I mean, I still wasn't sure it was true.  Where was all the barfing???!!  I hate throwing up with a passion, and I just knew if I ever got pregnant I would have morning sickness all day long.

Finally, it was Tuesday, but the Dr could not see me until the afternoon.  UGH!  I finally made it to the appointment.  Gave them my sample for the pregnancy test & a UTI, cause I was having symptoms for that.
Then sat, and waited in "the room" for the results.  I was so anxious.  Finally, the nurse came in and said, "It's positive".  I asked the pregnancy test or the UTI?  She said the pregnancy test.  I was so happy!!  I tried not to burst into tears.  My eyes did manage to water a bit.  She told me the Dr would come in to talk to me next.  I sent a quick text to my husband, who was very excited & happy.  The Dr came in smiling.  I said "I bet you weren't expecting to see me so soon!"  She said, "No, not for this anyway.  I'm really happy for you."  Of course we had the talk about me being high risk because of my age & Rheumatoid Arthritis.  She wanted me to stop all of my favorite drugs (Plaquenol & Mobic).  I was also on Zoloft, but she said it was better to leave me on it for now, because it is too hard for people to just stop taking it.  I've always been allergic to Tylenol, so I have taken Ibufproven & Aleve for pain.  But, no more, now that I was pregnant.  I was a little worried about this, but knew I could handle it.  She also told me I could not get my hair colored during my first trimester.  I had an appointment the next Tuesday, I would be canceling.  My gray roots were already looking pretty bad, but it would be worth it!!  Everything would be worth it. She said my due date would probably be around January 11, 2012.  We scheduled my first OB appointment in Oklahoma City with Dr McAdams with Mercy on June 21st.  OKC is about a 3 hour drive away.  Being high risk, that would be my best choice.  I would also consult with a high risk dr in okc.  And, have the baby in OKC.  I left her office very happy, and anxious for my first OB Appointment.

I called my mom & sister, and told them first.  They were very excited!!  My sister knew what I was going to say, but my Mom was surprised.  I also sent a text to a few of my closest friends, Angie Newell, Tammy, Tracy, Angie Chambers & Ginger. My husband told his close friends & his sister.  Of course all were very excited for us!!  We also shared the news with Kennedy, my husband's daughter.  She was so happy to find out she would be a big sister.  She really wants a girl.  So she can teach her dance, about girl scouts, and how to dress, and just be a girl!

My UTI was positive, and Dr Snyder put me on antibiotics.  When they were finished, I was still having bladder pain, so I went back to do another UTI to see if it cleared up.  A couple of days later, the nurse called to say it was clear and Dr Snyder wanted the detail of my pain.  I've had lots of UTI's in my life, and sometimes I would still hurt, even after the infection was gone.  I explained the pain was very low, right where my bladder was.  Dr Snyder decided she wanted me to have an ultrasound, to make sure everything was ok.  So, I was a bit freaked!  But, pretty sure it was just my bladder.  I had no discharge or cramping or anything like that, which eased my worry.  On June 19th I had my first ultrasound in Woodward, a thirty minute drive from Buffalo.  I was pretty excited, but also nervous that something may be wrong.  My bladder was not hurting so bad.  I was drinking tons of water by now, which I think helped.  I was only about 9 weeks pregnant, so they weren't sure if they would be able to see the baby with the regular ultrasound.  Lucky for me, they saw the baby right away, and everything was great.  I teared up when I first saw it, and it really, finally felt real!  I was pregnant!  And the baby was just fine.  Praise God!  Heartbeat was 166.  Nice and healthy.  Now I had pictures of my baby, and things were going good.  So, time to share my news with everyone, via Facebook of course.

This is my favorite picture of the baby from the ultrasound.
Baby Harper is only about 1 inch long!

Since all of this, I had a follow up with Dr Snyder.  We heard the heartbeat, it was 169.  I had my first visit with my OB Dr McAdams in okc.  Heartbeat was 166.  Did some lab work, everything is good so far.  I have also had an appointment with my High Risk OB Dr Smith, and another ultrasound.  Did lots of lab, and will find out in about a week the results of it.  A lot of genetic testing, because of my age.  Here is my favorite picture from that ultrasound.  The Dr thinks the baby is a girl.  We should know for sure in about 6 weeks, when I'm scheduled for my gender ultrasound.  YAY!
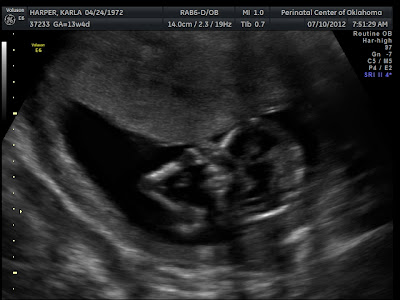
Baby Harper is the size of my closed fist


Thursday, April 26, 2012

Easy Orange Chicken

This is a very easy recipe for Orange Chicken.  My whole family loves it.


Ingredients:
3 boneless skinless chicken breasts cut into bite sized chunks
1 C flour
1/2 Bottle of "Panda Express Orange Sauce"
Salt & pepper to taste
3 Tblsp vegetable oil
2-4 servings of instant rice

Place your chicken bites in a bag with flour & shake until covered.
Heat your vegetable oil in a large skillet, then add the chicken.
Cook through & until light brown.
Poor half the bottle of "orange sauce" over your chicken & stir.  Simmer for a minute or two
Serve over rice.


Sunday, April 8, 2012

Pepperoni Stromboli

This is a very easy recipe, the whole family loves.  And, it tastes great!

The Recipe
Preheat oven 350F

Crusty French Loaf by Pilsbury (in the biscuit section)
Pepperoni  6ozs.  (I use about half)
2 C Shredded Mozzarella Cheese 
1 Jar Pizza Sauce

Lay your loaf on a cookie sheet coated with cooking spray.  Unroll the loaf, you will see a seam, this is where you will start unrolling it flat.

Lay on your pepperonis first, then the cheese.  Leave about 1/2-1 inch on all 4 sides

Now, roll it together, like a cinnamon roll.  Pinch both ends together and pinch the seam, so nothing runs out.  Place the seam on the bottom.
Bake for about 20 minutes, let cool at least 5 minutes before slicing.

Slice in 1-2 inch pieces.  Serve with pizza sauce for dipping.  Enjoy!!

You can add to this, or even change the ingredients.  Ham & cheddar cheese with ranch dressing would be great too.


Wednesday, April 4, 2012

Mother's Day Flowers

Yesterday Kennedy & I planted seeds & gladiola bulbs in pots & a mini greenhouse.  I'm hoping they will be ready for Mother's Day.  A great gift for our Mother's on their day.    I plan to post their progress here.  I don't really know what the seeds are, because a friend gave them to me.  They have a beautiful backyard.  With 4 fish and bullfrog ponds.  I'm going to take pictures soon, because the Redbud trees are blooming, making it even prettier.
Kennedy getting the dirt ready for the seeds
She loved using our recycled water vessel.  An old orange juice
bottle


I poked several wholes in the lid of this orange juice
bottle with a nail & hammer.  Perfect for watering my herbs
and our seeds.

Friday, March 23, 2012

Clothespin Clips

I have used clothespins to clip lots of thing for years.  I clip chips, snacks, bags of salad, freezer items, bags of sugar & flour.  Pretty much everything that needs to be clipped closed.  In the past, I just used the plain old wooden clips.  Recently I've seen lots of clothespins decorated.  It is so easy, even your kids can do it.
I did two types of decorative clothespins.  I used Glitter Glue & Duct Tape.  With the duct tape, you just cut it to the size of your clip and tape it on.  Simple!  You can also add some bling, or just leave it.  Either way is super cute.


After the glitter dries.
Glitter Glue takes a bit more time.  I just did lines of glue, side by side.  Then let it dry overnight.  Flipped it over, and did the other side.


Add some bling!

The results.  Much cuter!

Monday, February 27, 2012

Recycled Jars

There are so many tutorials and ideas out there for mason jars.  Personally, I don't want to spend extra money on mason jars.  I use my mason jars for canning my summer crops.  Instead, I recycle all my jars....pizza sauce, pickle, mayo, jelly, peanut bar...pretty much all jars (glass & plastic).  I use most of my jars for storage in my craft room, I have used a few as gift containers.
Here are a few of my jars.  I have a theme in my craft room, zebra & neon green.  I use duct tape to decorate my jars, along with scrapbook paper, mod podge, labels, spray paint and glitter.  My organization, is mostly recycled things.  Since everything is a mix match, I tried matching things up a bit with duct tape.  Here is the link to the labels.  You can customize them yourself.  Very cute!!

Recycled pickle jars.  Spray paint, duct tape and custom labels were used to decorate these.

More duct tape organization.  Small plastic tubs, without their lids.

Another plastic container, and these scrapbook paper sized plastic shelves.  These are all items I've had for years.  Now everything coordinates.


I also have a cardboard box, I put duct tape around & use for storage for my bedazler and the beads.  I'm being realistic here.  There are lots of great, fancy craft rooms out there.  I'd rather spend my money on my crafts.  I'm just glad to get organized!!


Sunday, February 26, 2012

Collar Flower Bling


Ok, I think I'm ready to explain how to make the cute dog collar flower bling.


This is my model, Rosalea.


Tools:
  • Ribbon (any width would do, best would be 7/8" to 1 1/2", I've even used smaller)
  • About 3-4" of 3/8" width ribbon
  • Quarter, Half Dollar or Dollar coin
  • Wood Burning Tool
  • Glass working surface (I used the glass from an old picture frame, and wrapped the edges with duct tape)
  • Needle & Thread
  • Hot glue or E-6000
  • Plastic hair band (I use clear plastic bands. The tiny ones from Walmart)


Here's my glass surface, wrapped in duct tape.  Ignore the glue & glitter mess.


Plug in your wood burning tool.  This is great on the ribbon, because it seals the edges, so they don't fray.  I got mine at walmart for around $10.00.  Lay your quarter on your ribbon (this is the 7/8" ribbon) and carefully burn around the quarter to make your petal.  You will make 5 petals in all.

The white zebra petals were made with a Dollar Wood coin, the pink with a quarter.  You can use a quarter on all of the ribbon.  Just use what is handy.
Next take your needle and thread (with a knot at the end of the thread) and stitch at the bottom of your petal, as shown above.  You will follow the same pattern with each petal, adding to the same strand of thread.

Now you have all petals on your thread..

Pull the thread together, scrunching up your petals into a flower.  Pull it as tight as you can, and tie the two ends together, making a couple of knots in the back of the flower.  Cut off your loose ends.
Here's the first flower.  I like to bling mine up.


I have these cheap little Acrylic Jewels from Walmart, and Bedazzle beads.  You can get a variety pack of those at Walmart too.  You don't need the actual Bedazzler.  I live in the boonies, so I rely on Dollar General & Walmart for a lot of my craft needs.  When I get near a Hobby Lobby or Michaels, I have to really stock up!!

You can use your hot glue gun or E-6000 glue.  E-6000 takes longer to dry, but works great.  Hot glue is faster, and safer, but not as sturdy.  Think about safety when making these.  Do you have other dogs who may chew on the flowers?  If so, your best bet would be to remove the flower, when you are not present.  For some reason, my dogs do not chew on their, or each other's flowers.


I used E-6000 on this, and a bedazzle bead.  There are prongs on the back, you may need to bend them in. If you have several layers of flowers, you really don't have to worry about it.

Now I take my 3/8" ribbon and hair band, tie the ribbon around the band in a tight knot.  Use a lighter to sear the edges of your ribbon, so it will not fray.

Next, layer and glue.  If you want to make more than one flower layer you can.
2 layers of flowers.  This is the 1 1/2" and 7/8" width ribbon.
Now, just add them to your dogs collar, or hair!
Here's my sister's Yorkie wearing one.  Not the best pic, but you can see they make cute top knots.  This is just one layer, since she is small and it is on her head.


And, Rosalea wearing one of her Flowers.  Always styling, my little fashion diva!!  ****Don't forget, always be safe when trying new things with your pets.  This could be a choking hazard!!  Please be careful & watchful!*****


Here are several other Bling Flowers I made.


This is how the flowers stand up after several weeks of wear.

Pig


Rosalea, near the flower bed
Jinx with her flower bow as a top knot

Great as a top knot!